|
|
 |
|
Now the instrument cluster is free and can be carefully placed face
down on a soft towel. The two mounting tabs which protrude out from
the top of the cluster actually prevent it from lying flat, but you still
have to watch out. The plastic face on the cluster is very easy to
scratch - I cannot stress this enough.
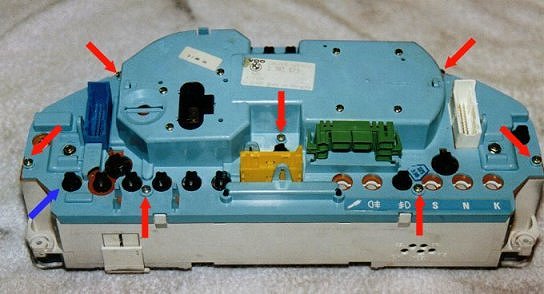
We now want to split the cluster (separate the front from the back). This is done by removing 9 small Philips screws from the back of the cluster, 8 around the periphery and one in the center. Several of the Philips screws are pointed out by the red arrows above. The blue arrow shows the row of "idiot lights" (abs, battery etc...) The bulbs for these lights screw in from behind and can in theory be replaced from behind the dash without removing the cluster. Also note the color coded electrical sockets (white, yellow, blue, and green). There is a gray connector which goes into the black socket as well. It is the green connector/socket combination which has several possible combinations and must be observed upon removal. Once the nine Philips screws are removed you can carefully separate the blue cluster back from the cluster face. Watch out for the gauge needles! |