|
Install: When using a 3" racing harness in conjunction with the stock E30 M3 seat you are pretty much forced to use a 6-point setup. This is because the construction of the seat prevents a sub-belt from going straight down to the floor. With the double sub-belt you can direct each of the two straps off to the side a bit to avoid the obstruction. In order to clearly visualize this it is necessary to have a look underneath your seat. I did not fully understand what people meant until I looked. The sub belt is mounted by cutting a slit in the leather flap between the seat bottom and the extendable thigh support. Thus this install is not for the squeamish 8^) Figure 1 above shows the sub-belt coming up through the seat. Do not be tempted to direct the sub-belt up around the front of the thigh support. This puts it much too far forward. Even with the sub-belt coming up between the seat bottom and thigh support it is still about 4 inches too far forward, but it is at least serviceable.
So you have decided what type of safety belts to install in your M3. Now comes the task of mounting the belts to the vehicle in a secure manner. For a 2" harness it is possible to mount the shoulder belts to the factory hard points for the back seat passenger seat belts. This would only be done if one were attempting to install a safety harness without having a roll bar. However, many people believe this to be bad practice as the safety harness will not allow your body to slide out of the way in case the roof caves in during a roll over. If you roll and the roof collapses, and you are firmly strapped into your seat without a roll bar, well then your head will have to support the weight of the car, since nothing else will. It is because of this that it is generally recommended to install a safety harness (2" or 3") only if you have a roll bar or cage. Of course with a roll bar in place, the mounting of the shoulder straps is simplified - they mount to the harness bar which is included in almost all roll bars and cages. This is a horizontal bar which goes between the main hoop and the main diagonal. It should ideally be located a couple of inches below your shoulders, certainly not above your shoulders. Likewise, the shoulder belts should not be mounted too far below your shoulders, as they may then compress your spine in a collision. The Simpson catalogue offers a sketch which outlines proper harness mounting zones. In an E30 the mounting of the lap and sub belts is not straightforward. I had hoped to be able to employ at least some of the factory hard points but could not come up with a configuration that I felt comfortable with. The outside lap belt could possibly be mounted to one of the bolts which holds the stock seat belt "slider". It has been pointed out to me by Rick Ricker that the eye bolts supplied with belt kits will screw into the factory seat belt hard points. I did not personally try this. In any case, mounting the inside lap belt would still be a problem unless you mount it to the seat, which is where the factory seat belt receptacle is attached. However, this goes against everything that I have read or heard. It seems to be regarded as bad practice to mount any part of a safety harness to the seat. The harness should be attached to the chassis, independent of the seat. Makes sense to me, so this is what I did. I mounted both the lap belts and the sub-belts to the floor pan with eye bolts. In an ideal world, I would have a full roll cage and then proper harness hard points could be welded onto the cage (which I did in my old Rabbit). But I currently do not have that luxury on the M3 as I am trying to keep it somewhat civil. Although I employed eye bolts, I did not use the "fender washers" that come with the harness kits. These large diameter washers are intended to keep the eye bolts from ripping out of the floor pan during a crash (if you've ever closely inspected a unibody floor pan you will appreciate that this is quite plausible). The supplied washers just did'nt give me a "warm fuzzy" so I went a bit further. I fabricated some backing plates from 4" x 1/8" hot rolled steel. This material is commonly used for baseplates on weld-in roll cages. I got the pieces for free out of the scrap bin at the local metal supply. The piece for the lap belts is 14" across, while the one for the sub-belts is 12" across. I feel comfortable that these backing plates will prevent the eyebolts from pulling through the floor pan under a severe crash. Figure 2 above shows how the belts are mounted to the chassis. Note the shoulder belts wrapped around the roll bar. You can also see the cadmium plated eye bolts poking through the carpeting on the floor. The lap belts and sub-belts clip into the eye bolts.
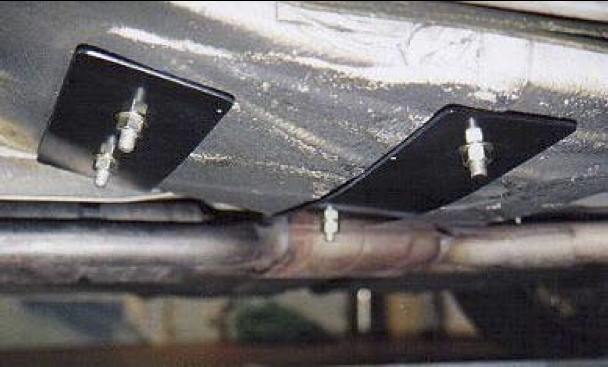
Figure 3 depicts the backing plates as they appear underneath the car. The plate on the right is for the lap belts (rearmost) and the plate on the left is for the sub-belts. The catalytic converter(s) can be seen in the background. If you refer back to Figure 1 you will see that I routed the lap belts between the seat bottom and the backrest (as opposed to around the seat). This was done on a recommendation from my friend Randy Walters. He pointed out that if the lap belts are merely looped around the seat then it is very difficult to get them tight as you end up compressing too much foam. Even as it is, the harness is still difficult to get tight, as it pushes you down into the lower seat cushion, which just compresses more and more. In my old Rabbit I had a Sparco race seat with very minimal padding. There it was much easier to secure the harness. Nonetheless, the addition of a 3" 6-point harness has provided an order of magnitude increase in my attachment to the car. It allows my arms to concentrate on steering, instead of holding me in place 8^) |